Vance Powell’s Vocal Chain: Three Processors, One Philosophy
Vance Powell’s Approach to Vocal Processing
“If it ain’t broke, don’t fix it,” would be an accurate way to describe Vance Powell’s approach to vocal processing. He’s been using the same three processors—a Neve 1073 preamp, an Empirical Labs EL7 FATSO Jr tape emulator and a UREI (or UA) 1176 FET compressor—on his lead vocal tracks since the analog days.
In this excerpt from Start to Finish: Vance Powell - Episode 10 - Mixing Part 1, he’s focusing on the lead vocal track for the mix of Illiterate Light’s song, “Sweet Beast.” He shows you how and why he applies the three processors, in this case, UAD2 plug-in emulations.
Three’s Not a Crowd
The processors used
In this session, he’s using the UAD UA 1176 Rev A (with the blue stripe), the UAD Neve 1073 and the UAD Empirical Labs EL7 FATSO Jr. In case you’re wondering, FATSO is an acronym for Full Analog Tape Simulator and Optimizer.
Routing the vocal signal
He sets the vocal track output to Bus 32 and routes it into three aux tracks,each with one of the processors inserted on it. He names the FATSO Jr track “Vocal Crush,” the 1073 track “Vocal Buzz” and the 1176 track “Vocal Clean.

Vance compresses the vocal lightly with the UAD UA 1176 Rev A.
Gain Staging and Clean Compression
Establishing levels
He puts all the aux tracks at unity gain (0dBFS), and then he turns the vocal track down to about -10dB. He explains that he’ll turn it up until he gets a “couple of dB” of gain reduction from the 1176.
Why the 1176 is set this way
The reason he’s doing it like that is that the 1176 doesn’t have a threshold knob. A combination of how hard you hit the input and where you set the ratio (he has it at its lowest setting, 4:1) controls the amount of compression.
He explains that this is a typical vocal compression setting for mixing. It’s pretty subtle, which is why he refers to it as “clean.” He wants it to take off a little of the amplitude peak. He says the sound coming out of the 1176 is the basis for his vocal sound.
Console Level Management
He’s sending the Pro Tools tracks to inputs on his console, and he has to make sure their levels (at the console inputs) are where he wants them. He says they should be about 0dBu. Initially, they’re a little loud, so he turns the three Pro Tools vocal aux tracks (which he has grouped) down a little.
Smash It: FATSO Jr and Heavy Processing
The role of FATSO Jr
Next, he moves on to the FATSO Jr which he describes as the “absolute inverse” of the 1176. Everything is “blasted wide open.” It has four different processors in it: Saturation and Distortion, a Warmth Processor (high-frequency distortion), Transformer and Tape Head Emulation and a Compressor. He’s using everything except the Transformer in this setting.

He uses the FATSO Jr for heavier processing, including saturation. This is the setting he used in the video.
Parallel Processing Explained
Common parallel approaches
He applies FATSO Jr and the 1073 in parallel, although the way he has the vocal tracks configured in the Pro Tools mixer is unusual as parallel setups go. Usually, you see parallel processing applied in one of several configurations. One is to duplicate the source track and compress only the copy while sending both to the mix bus (or possibly another bus first). Another is to route the source track to the aux or auxes where the processors are, using a send.
A third method, which you don’t see as often from pro engineers, is to insert a processor that has a wet/dry control directly on a source track and turn that control considerably below 100%, which results in blending the processed and dry signals.
Why parallel processing works
With all of these methods, you have separate control over the level of the processed and dry signals, allowing you to achieve the blend you want. Parallel processing—particularly with compression—allows more of the original transients to come through, yet still sounds processed.
Vance’s Hybrid Parallel Setup
What Vance has setup is a bit different. The vocal track’s output is the bus that’s feeding all three of the processor tracks. There is no dry output like in the configurations just mentioned. Instead, he’s using the Clean channel with the 1176 on it as his de facto dry track and bringing in the audio processed by the FATSO Jr and 1073 tracks into the signal in parallel.
He starts by turning the original vocal track down some because it’s the one that will be driving the amount of compression on the 1176. Then he slowly turns it up until he’s getting a couple of dBs of vocal compression. He puts all three aux channels in “solo safe” mode, meaning they’ll stay active when he puts other tracks into solo.
What’s the Buzz? (Adding Harmonics with the Neve 1073)
The distortion technique
He turns next to the UAD Neve 1073 and explains that the technique he’s using was shown to him by Jack White when they were mixing the album “Consolers of the Lonely” by the Raconteurs. The idea is to put distortion on the vocal with the 1073.

Turning the gain up on the UAD Neve 1073 plug-in allows Vance to add more saturation to the vocal.
Gain compensation and filtering
Vance explains how the UAD 1073’s input starts in the Line level area. You can’t turn it to the Mic level area until you first click the knob. Once you do get into the mic area, you’re adding 30dB of gain. He thinks it’s the closest thing to a real 1073. He compensates for all that extra gain by turning down the 1073’s output an equivalent amount. The result is that he’s hitting the input hard but not overdriving the Pro Tools channel. He also dials in the 1073’s high-pass filter at 60Hz to reduce unneeded low-end information.
Balancing the Parallel Paths
Next, he plays the mix and adjusts the relative levels of the three parallel tracks.
He says that depending on the song, he’ll sometimes add more distortion from the 1073.
Even on ballads, he uses it but sets it low.
Fat Sounds: Using FATSO Jr Beyond Vocals
General characteristics
Vance used the Empirical Labs EL7 FATSO Jr on vocals in this example, but it’s a versatile plug-in that you can use to warm up, squeeze or saturate any source. The UAD plug-in version of the EL7 has even more processing options than the original hardware. You can use any combination of its processors.
Compression and warmth
The higher you turn the plug-in’s input, the more harmonic generation and soft clipping you get, and the harder you hit the compressor if it’s turned on. The compressor has four different modes, Track, Buss, GP and Spank. Each has a preset selection of parameters including knee, attack, release and so forth.
Another of the EL7’s effects is the Warmth Processor, which attenuates high-end information, simulating what happens when recording to tape.
In the Trenches: Listening Examples
For Examples 1 through 4, you’ll hear individual tracks soloed from a mix of a funky instrumental. For the first two measures of each, the processing on the FATSO Jr is bypassed so you can compare when it’s engaged starting on bar 3.
Example 1: Drums
Ex 1. Here’s the stereo drum track. The drums are being processed in parallel (from an aux bus) by FATSO Jr’s G.P. (General Purpose) compressor, which is providing about 5dB of gain reduction with the Warmth circuit is set full. In this case, the effect of the FATSO Jr is to give the snare some more oomph and make the whole kit sound slightly more saturated.

The setting for the drum kit’s parallel processing.
Example 2: Bass
Ex. 2: Inserted on the bass track, FATSO Jr is adding some heft with the transistor emulation, which adds harmonics at 150Hz and under. The Warmth is turned to a low setting and the compressor algorithm is set to Tracking, which is attenuating by up to about 7dB.

The bass setting.
Example 3: Lead Guitar
Ex 3. The lead guitar track has FATSO Jr inserted on it. The compression is relatively high and uses the Spank algorithm, which is aggressive sounding. The Warmth is up pretty high, and the Tranny (transistor emulation) is on, giving the sound some additional presence and strength.
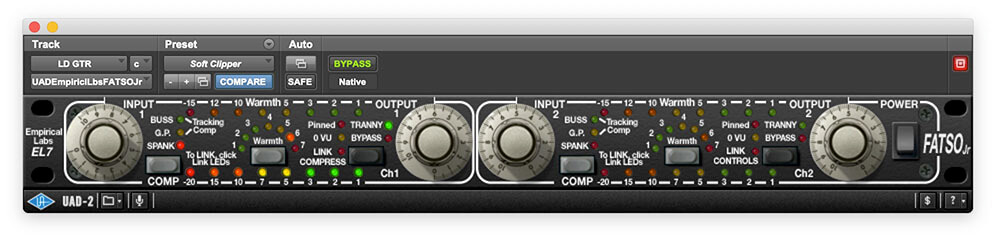
The lead guitar setting.
Example 4: Rhythm Guitar
Ex. 4: The setting for the rhythm guitar includes light compression using the Buss algorithm, which has a slow attack that keeps the transients from being squashed. The Warmth is on low—too much would detract from the clean sound that’s important on a funky rhythm guitar of this type—and the Tranny circuit is on, giving it a little more edge in the midrange.

The rhythm guitar setting.
Example 5: Full Band
Ex. 5: Here’s the full band. The FATSO Jr processing is off for all the instruments until bar 3, when it all comes on and stays active throughout the rest.
